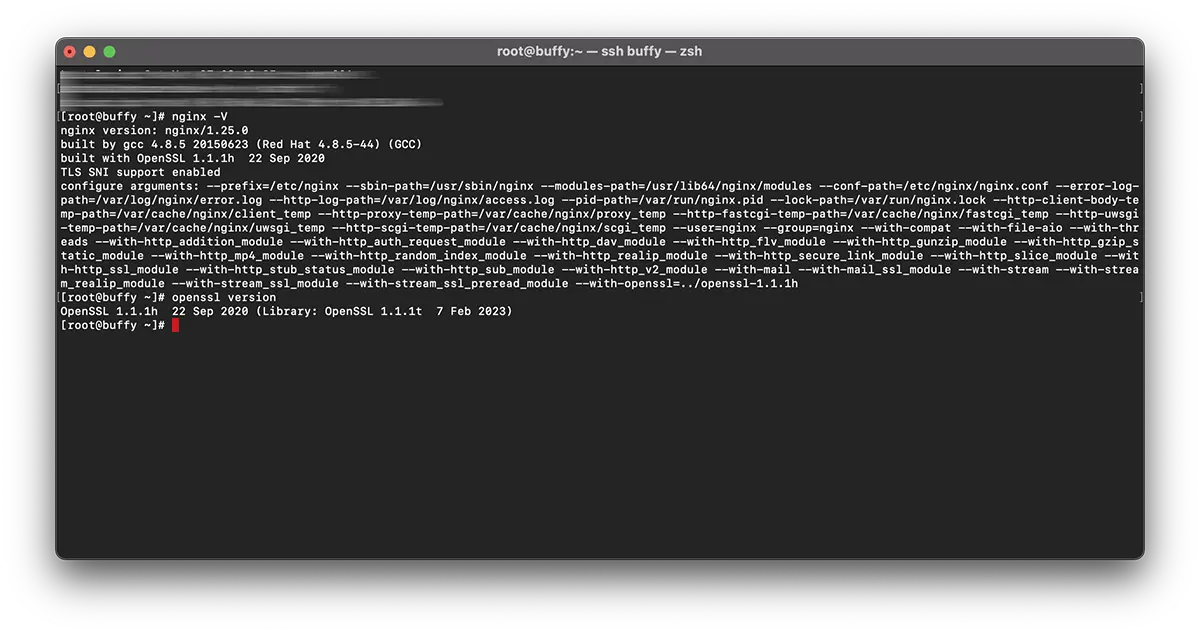
Recompiler OpenSSL 1.1 & NGINX 1.25 pour TLS 1.3 (CentOS 7), suivant le scénario où vous avez déjà installé sur le serveur o ancienne version openssl associé au service nginx.
Plus précisément, pour pouvoir activer OpenSSL 1.1.1t pour le service NGINX, qui fonctionne avec une version plus ancienne. OpenSSL 1.0.2k.
# nginx -V
nginx version: nginx/1.25.0
built by gcc 4.8.5 20150623 (Red Hat 4.8.5-44) (GCC)
built with OpenSSL 1.0.2k-fips  26 Jan 2017
TLS SNI support enabled
# openssl version -a
OpenSSL 1.1.1t 7 Feb 2023Cela signifie qu'il existe deux versions différentes de OpenSSL. Une version installée sur le système par "yum"(1.0.2k-fips) et une version OpenSSL installé par compilation manuelle (openssl 1.1.1t).
Classiquement, la plupart recommandent de réinstaller 'OpenSSL' au niveau du serveur. Cela impliquerait d'exécuter la commande : yum remove openssl. Mais il y a un gros problème ici. Avec la désinstallation de l'ancienne version OpenSSL, vous devrez peut-être également désinstaller certaines applications dépendantes. Tel que: nginx, MariaDB-server, cerbotAinsi que de nombreux autres.
Une solution plus simple consiste à recompiler openssl 1.1 & nginx 1.25 pour TLS 1.3.
Sommaire
Tutoriel de recompilation OpenSSL 1.1 & NGINX 1.25 pour TLS 1.3 (CentOS 7)
Dans mon exemple, la recompilation est pour nginx/1.25.0 & OpenSSL 1.1.1h utiliser les librairies OpenSSL 1.1.1t.
Recompilez NGINX.
1. Créez le fichier : nginx-with-tls13-compile.sh
sudo nano nginx-with-tls13-compile.shoù vous ajoutez le script :
#!/bin/bash

## nginx
NGINX=nginx-1.25.0.tar.gz

if [ ! -f "${NGINX}" ];then
    wget https://nginx.org/download/${NGINX}
fi

ND=$(basename $NGINX .tar.gz)
if [ ! -d "${ND}" ];then
    tar zxvf ${NGINX}
fi

cd ${ND}

## pre require package
## yum install gcc pcre-devel zlib-devel

./configure --prefix=/etc/nginx \
    --sbin-path=/usr/sbin/nginx \
    --modules-path=/usr/lib64/nginx/modules  \
    --conf-path=/etc/nginx/nginx.conf \
    --error-log-path=/var/log/nginx/error.log \
    --http-log-path=/var/log/nginx/access.log \
    --pid-path=/var/run/nginx.pid \
    --lock-path=/var/run/nginx.lock \
    --http-client-body-temp-path=/var/cache/nginx/client_temp \
    --http-proxy-temp-path=/var/cache/nginx/proxy_temp \
    --http-fastcgi-temp-path=/var/cache/nginx/fastcgi_temp \
    --http-uwsgi-temp-path=/var/cache/nginx/uwsgi_temp \
    --http-scgi-temp-path=/var/cache/nginx/scgi_temp \
    --user=nginx \
    --group=nginx \
    --with-compat \
    --with-file-aio \
    --with-threads \
    --with-http_addition_module \
    --with-http_auth_request_module \
    --with-http_dav_module \
    --with-http_flv_module \
    --with-http_gunzip_module \
    --with-http_gzip_static_module \
    --with-http_mp4_module \
    --with-http_random_index_module \
    --with-http_realip_module \
    --with-http_secure_link_module \
    --with-http_slice_module \
    --with-http_ssl_module \
    --with-http_stub_status_module \
    --with-http_sub_module \
    --with-http_v2_module \
    --with-mail \
    --with-mail_ssl_module \
    --with-stream \
    --with-stream_realip_module \
    --with-stream_ssl_module \
    --with-stream_ssl_preread_module \
    --with-openssl=../$(basename $OPENSSL .tar.gz)

make

sudo make install

nginx -V
Enregistrez le nouveau fichier.
2. Créez le nouveau fichier exécutable :
chmod +x nginx-with-tls13-compile.shRécrire nginx.service
3. Faites une sauvegarde de nginx.service.
cat /lib/systemd/system/nginx.service > /srv/nginx_service.txt(vous pouvez choisir n'importe quel chemin que vous voulez pour nginx_service.txt)
4. Créez le fichier pour le service nginx: nginx.service
sudo nano nginx.service5. Dans le fichier le nouveau fichier nginx.service ajouter les lignes :
##  /lib/systemd/system/nginx.service

[Unit]
Description=The NGINX HTTP and reverse proxy server
After=syslog.target network.target remote-fs.target nss-lookup.target

[Service]
Type=forking
PIDFile=/run/nginx.pid
ExecStartPre=/usr/sbin/nginx -t
ExecStart=/usr/sbin/nginx
ExecReload=/usr/sbin/nginx -s reload
ExecStop=/bin/kill -s QUIT $MAINPID
PrivateTmp=true

[Install]
WantedBy=multi-user.target
6. Copiez le fichier dans 'daemon" .
sudo cp nginx.service /lib/systemd/system/nginx.service7. Une fois le fichier copié, mettez à jour les autorisations du fichier à l'aide de la commande :
sudo chmod 644 /lib/systemd/system/nginx.service8. Recharger la configuration systemd pour prendre en compte les modifications à l'aide de la commande :
sudo systemctl daemon-reload9. Redémarrez ngnix.
sudo systemctl restart nginxRecompiler OpenSSL / NGINX pour TLS 1.3
10. Dans le même dossier où vous avez les fichiers nginx-with-tls13-compile.sh şi nginx.service, créez un nouveau fichier : openssl-1.1-compile.sh.
sudo nano openssl-1.1-compile.shAjoutez le script :
#!/bin/bash

## Compile OpenSSL
OPENSSL=openssl-1.1.1h.tar.gz

DONE=openssl-compile-done

if [ ! -f "${DONE}" ] ;then
    wget https://www.openssl.org/source/${OPENSSL}

    tar zxvf ${OPENSSL}

    cd $(basename $OPENSSL .tar.gz)

    ./config shared no-idea no-md2 no-mdc2 no-rc5 no-rc4 --prefix=/usr/local/

    make

    sudo make install

    cd ..

    touch ${DONE}
fi

export LD_LIBRARY_PATH=$LD_LIBRARY_PATH:/usr/local/lib64/

read -n1 -r -p "$(/usr/local/bin/openssl version) - Press any key to continue..." key

source ./nginx-with-tls13-compile.sh
Remplacer "OPENSSL=openssl-1.1.1h.tar.gz” avec la version que vous souhaitez installer et recompiler avec NGINX.
11. Rendez le script exécutable :
chmod +x openssl-1.1-compile.sh12. Exécutez la commande :
./openssl-1.1-compile.shAttendez que le processus de recompilation soit terminé OpenSSL & NGINX.

Si nous pouvons vous aider ou s'il y a des ajouts à faire, la section commentaire est ouverte.